Ah, polka-dotted soap - who doesn't like a candy pink, peppermint-scented confection studded with racy hot pink + black symmetrical design-work? Looks lighthearted and innocent, sure, but Jezebel Soap* earned its historically controversial name.
The polka-dot technique was the brainchild of Tatiana Serko of @bysteso, introduced to me through a Soap Challenge Club invitation by Amy Warden.
After coming up with a design concept, color palette, and scent, the production process started with a matching top/bottom template for precisely-spaced holes that have to be drilled into some kind of base. I used corrugated cardboard taped with packing tape to help shore up the structure.


Though I chose to do a simplified version of this design, using a standard 10" loaf mold and common-sized straws, fitting the straws into the base, then threading them up through the matching top template, took awhile. I learned that trimming the straws to extend just over the top lip of the mold (vs keeping them full length, helped somewhat.

The "straw-free" holes are where the base layer of pink was poured into the mold.
After allowing the soap to set and CPOP overnight, it was time to remove the straws. That was a nerve-wracking/hand exhausting process, and one that couldn't be rushed. Each straw had to be gently twisted as it lifted from the base soap. Remove them too quickly or carelessly could lead to uneven holes. Yeesh.


Next was filling the holes in the predetermined pattern. I wasn't worried about the overflow of soap, as the bars needed to be planed later anyway, but I was concerned about making sure that the holes were completely filled.

Even though I used a pipette, there were still air bubbles caught in a few of the holes after the cut. I had to go back with soap dough (partially set soap from the leftover soap fill colors) and plug up a few stragglers.
(The corner hole illustrates the before/after.)


(filling random holes were the "Jezebel" moments, in the classic, biblical sense 😂).
But after all of that, they really came out beautifully. This set of bars has the classic cut, displaying the side stripes from the colored holes.
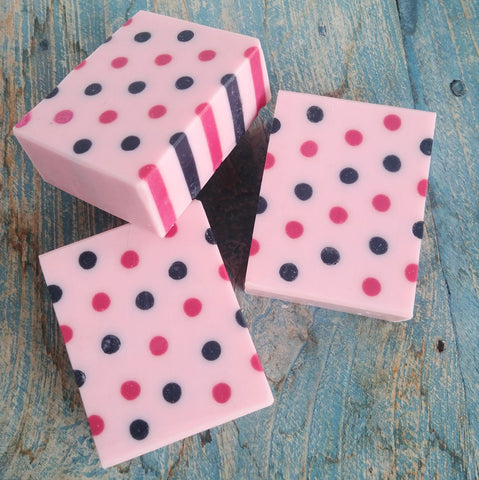
The square bar below preserves the sides, making it slightly larger.

Which look do you like better?
So while I'm pleased with the outcome, this was about 2+ days work for FOUR bars of soap. Was it worth it? Well...
I'm glad that I tried the technique - if I attempted this again I'd do a few things differently to bypass some of the more time consuming bits (like hole touch-ups) while producing more bars.
But...
Enjoy these now. I may never make them again.
😂
Leave a comment